Restauration of weapons.
l. BULLDOG-TYPE REVOLVER
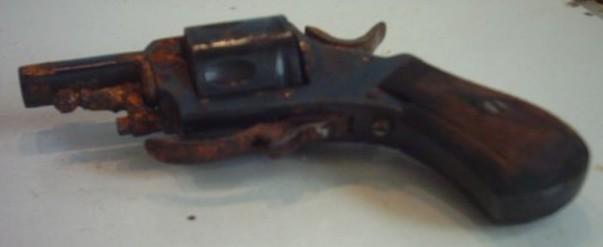
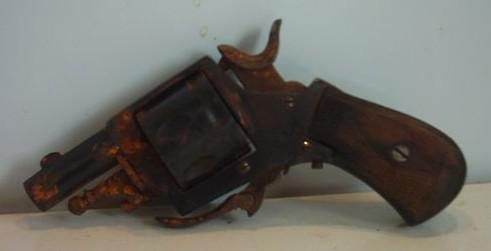
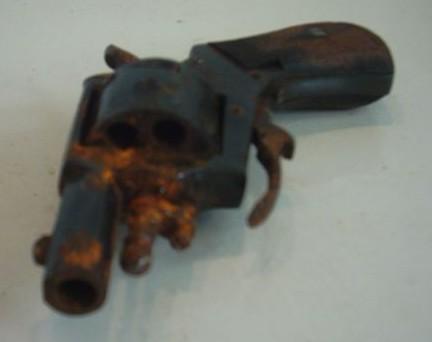
A friend of mine gave me a small Bulldog-type revolver for restoration. He wants the gun to be returned in the best possible condition.
Identification
- Bulldog-type six shot revolver, .320 short calibre, central fire, folding trigger
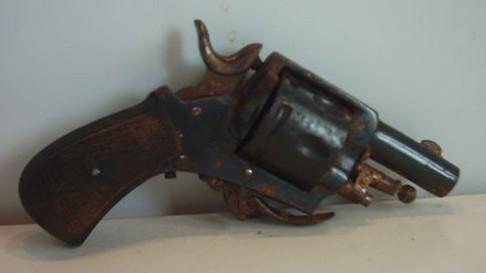
- Grips of ordinary quality walnut, chequered
- No maker’s marks or brand
- Liège post-1893 proof mark, controller’s mark C with star and number 44 on the rear of the cylinder
- Controller’s mark C with star on the right side of the chamber
- « cal.320 c » stamped on the right side of the frame, under the cylinder
- Smooth bore
- No « smokeless powder » proof mark
- Estimated date of manufacture: around 1895
Closer examination and diagnostics
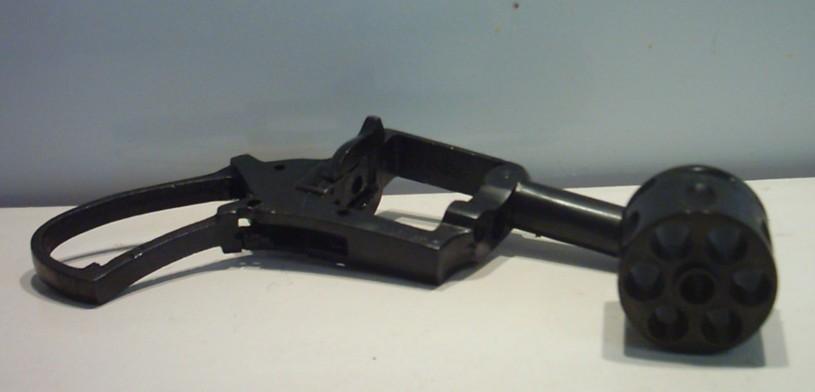
- Lock mechanism totally blocked by rust
- Deep and thick rust stains on some areas, likely an oxidation by some chemicals rather than humidity.
- Frame and cylinder appear to be in very good condition where there are no rust stains.
- Spurious blue colour
- Spurious case-hardening of hammer and trigger
- Grip plates chequering full of dried rust
A closer look at the gun reveals a formal amateur restoration. The blustery on frame and cylinder is too bright and too grey and tooling traces are still visible here and there under the blue colour. Besides, when the gun is seen from the front, the two sides of the top strap appear to be asymmetric. All edges appear to have lost their original sharpness due to a quite intensive use; yet the blue colour is also homogeny on those places.
The hammer and trigger have coloration between blue and yellow, most probably obtained by heating. The restorer clearly intended to give those parts a case-hardened look.
For the rest, all parts appear to be original except for the return spring to the trigger, which is cut from a steel stick instead of having been hand forged. Obviously a modern part.
At first I intended to remove the rust by electrolysis; however, that procedure has a bad effect on the springs, making them weak and very breakable; which means the gun has to be taken apart to remove them first. And what we have here is a gun that cannot be taken apart due to the heavy rust, so that I cannot reach any spring. The only alternative is to loose them.
So I decided to make a first trial with de-rusting oil.
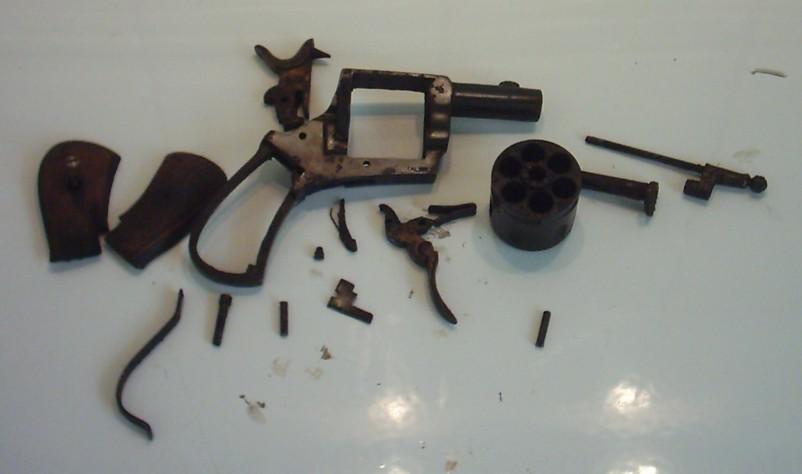
After 4 hours, the gun can be taken apart, except for the screw to the hammer rebound lever. The inner side of the gun is very dirty and requires a few days in a bath of petroleum in order to get rid of dirt and grease.

Repairs to be done
- Removing rust and dirt
- Repolishing of the whole gun
- Reblueing of frame and cylinder
- Hardening and polishing of hammer, trigger, axis screws and ejector lug
- Possible tuning of the lock-mechanism in single-action mode
- Cleaning and oiling of the grips
- Remounting
As neither the penetrating oil, nor the bath in petroleum could help unlocking that bloody screw, I’ve got only two options left to unscrew it: I can heath it to the red, or I can drill it out.
Heating
Here is no question of heating the screw by means of a welding torch, because doing that would also bring a too large part of the frame around the screw to such a high temperature that there would be a risk of alteration of the metallic structure. The best one can do is using a car battery or even a battery charger. An electric wire is attached at each contact, and provided with a metallic end; preferably copper, to be used as electrodes. The electrodes are then brought in contact with both ends of the screw itself, which initiates a shortcut. The shortcut will bring the screw very rapidly to a temperature high enough to get it hot red, with however a very limited effect on a small area around the screw. This treatment should normally blast the rust into pieces in the threads, enabling to liberate the screw.
I said: "should normally"... well, in this case it didn't work. The screw still refuses to move, so I have no other option left but to drill it out.
Drilling
That operation will obviously destroy the screw, which will have to be replaced. And of course, as it is for all Liège-made guns of this type and era, that screw has been made by hand with home-made tools. The threads are absolutely unique and impossible to reproduce, and the screw itself is of a diameter that can't be found anywhere.
Prior to drilling, I first punch a tiny mark in the point of the screw (not its head), in order to guide the drill and keep it in place. Then I start drilling carefully, using a drill of a diameter slightly smaller than that of the screw.
Once I reach through the first side of the frame, I stop drilling and try to punch out the screw using a small puncher and a light hammer. This time I get lucky: the screw comes out and I can finally take out the rebound lever.
In a next chapter I'll explain how I make a replacement screw.
Cleaning and polishing
Cleaning
I know there are many good ways to clean metal; yet I always start by using a soft copper wire hand brush in order to remove all the remaining dirt that had not been loosen by the penetrating oil.
This operation allows me to correct some erroneous information I reported before: the number 44 I first thought to have found on the rear of the cylinder, appears to be a 41 instead. That number is also found on the left side of the trigger block.
Unfortunately, the treatment also reveals worse damage caused by rust: here and there are pitting that is too deep to be removed by polishing.
Mounting "in the white" - checking the march and correcting mechanical defaults
Once the gun properly cleaned, it has to be remounted in order to check its working. The "march" or work is the interaction of all mechanical parts towards each other and they proper working. I notice that the return spring to the trigger is too far open, which makes it very hard to put in place; besides, the single-action notch in the hammer is partially worn, which makes the trigger too sensitive and unreliable once the hammer is cocked.
I make the notch slightly deeper using a very fine grain triangular file. This should correct the fowl.
A light filing on the upper arm of the return spring makes it also far friendlier.
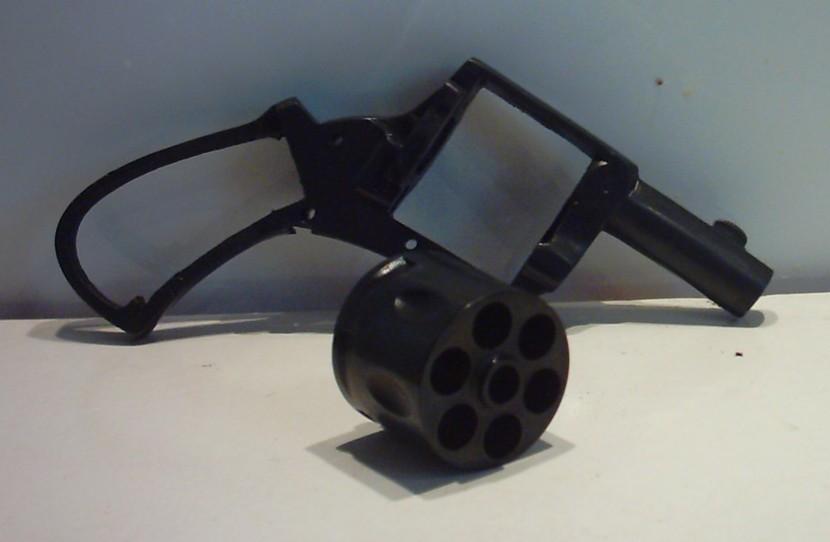
Once mounted, the gun works well. The chambers align the barrel perfectly, which excludes any problem with the pawn and the ratchet.
The cocked hammer takes the nut firmly, giving the trigger a satisfying resistance.
As the interior of the grips is black coloured, I deduct they were originally fully black coloured, imitating ebony-wood, which was often seen in those days. Less often seen, however, is their attaching system: here a woodscrew has been used, which pass simply through the left grip and screws directly into the wood in the left one, without any copper escutcheons. This feature looks original.
After a light polishing with fine grain sandpaper, I colour the grip using common China ink, applied with a small painting brush. The ink penetrates deep into the wood and once dried, the grips can be varnished using an old method, which will give them the exact appearance of true ebony.
I've got also a new screw to make for the rebound lever. For that I cut a piece of soft iron wire (like the one used on fences). To bring it to the right thickness, I place it into the mandrel of my drilling machine, and block the latter into a vice. This allows me to bring the piece of wire to a smaller diameter using a file, without alliterating its cylindrical profile. The wire must be left just thick enough to block into the screw hole without passing through.
Once there I cut a notch in the head of my screw, using a very fine handsaw.
Then I push the screw into its place. It is just thick enough, and I have to force a little on the screwdriver to seat it fully down, which allows the remaining threads in the hard steel original hole, to cut the soft iron to the right profile. That's all we need.
Now I could harden the screw by transforming the soft iron into hard steel, but that operation is too complicated for a simple screw. Hardening by common temper is sufficient.
I first heat the screw to the "cherry red" using a welding torch, and then I temper it hard by plunging it into cold water. Then I polish lightly to make it white again, and place it in a small metal plate on a common kitchen gas furnace. Once it reaches the dark blue matt colour, I take it out of the fire and let it cool in oil. This last operation is called the "oil return" and also applies on vie springs. It is meant to give the hard metal its elasticity back, without alliterating its hardness.
Now my screw is ready, and needs only a good polish to be perfect.
Repolishing
This is the longest and most delicate part of the entire restoration. One must remove as many as possible blisters and holes caused by rust, yet without removing too much of the surrounding metal. Allow me to say that in this matter as in others, "better" is often worse than "good". Restoration of antiques is in the first place a matter of patience.
Here are some basic rules:
- Any electrical device such as Dremel or others should be definitely banned. Although they make the job faster and easier, those devices are usually source of great damages.
- All markings should be well preserved. They can be cleaned, but should remain legible.
- The same remark applies to engravings and inlays.
- If the gun is deep pitted, but is still complete and functional, and if it is worth to be kept in the collection (scarce item, etc), a simple cleaning and de-rusting is often better than any attempt to repolish. Pitted parts are always better than alliterated ones.
In the present case, knowing that it will be impossible to remove all the pitting, I decide to give the gun a satin polish, which I obtain by using fine grain sandpapers, starting with a 400 grain, then an 800 and finally a 1000. I intend to "patinate" the gun once the job done, in order to give it an "antique" look (see notes in fine).
Polishing must be done carefully; the corners and notches should not be forgotten, and each used sandpaper should remove completely the traces left by the precedent one.
While polishing, I notice the following marks, which I hadn’t seen before yet:
- On the butt, a number 13 in very large digits. This number is definitely not a shop number; it looks more like a lot number. It resembles closely the numbers that are found on the revolvers used by the Belgian Mail (scarce!!); however the gun doesn't match at all the specific models used by the Mail. It could be the customs, or another official service...
- On the left side of the grip frame, the letters H.D. could they be the maker's logo? Possible, but I'm not sure...
Reblueing
Here again, there are dozens of procedures to reblue a gun. I explain some in my notes in fine. As far as I am concerned, I prefer to use a "warm" method, done in 3 phases.
Heating the steel at a certain temperature forces the contained carbon to concentrate on the surface of the metal, giving it a dark blue colour.
That blue coloration is highly resistant and gives a good surface protection against oxidation. It is stronger than the
most chemical treatments, yet it is also highly depending on the quantity of carbon contained in the steel; in other words its quality depends on the quality of the steel used to make the gun. (See details)
Important remark
The Bulldog-type revolvers are all featuring a hinged loading gate. This gate is attached by a very tiny screw, usually impossible to loosen, and lends on a flat spring which is vertically placed into the frame. That spring is also maintained by a flat screw, which is usually so tightly fastened into the frame that it is impossible to remove it without causing important damages.
The temperature needed for blueing being about 330°C, one can assume that the spring will loose its elasticity and break.
In order to avoid that problem, I never dismount the loading gate but I do the heating in 3 phases of 10 minutes each, which enables me to reach the blue at a temperature not higher than 220-250 °C.
The parts to blue are placed in an iron can with lid, and the can is placed on a common furnace of the Camping-Gas type. I watch the heating: the parts get slowly light blue, and then turn to a matt grey. After 10 minutes, I remove them from the fire and plunge them in oil for about 5 minutes. Then I take them out of the oil, still hot, wipe them clean and wash them carefully in hot water with detergent.
The oil must be washed away completely in order to avoid brown stains in the next heating. (See notes)
This entire operation is done again twice.
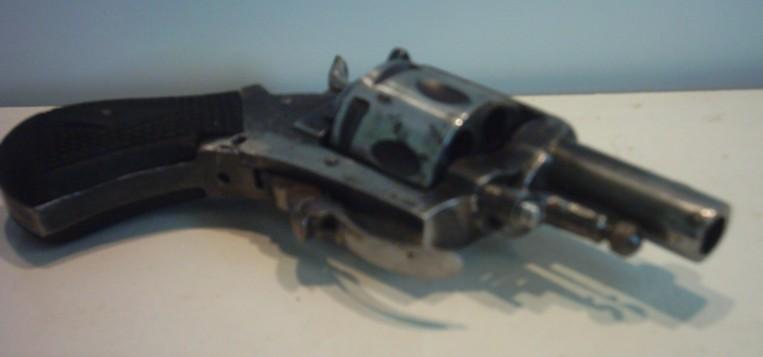
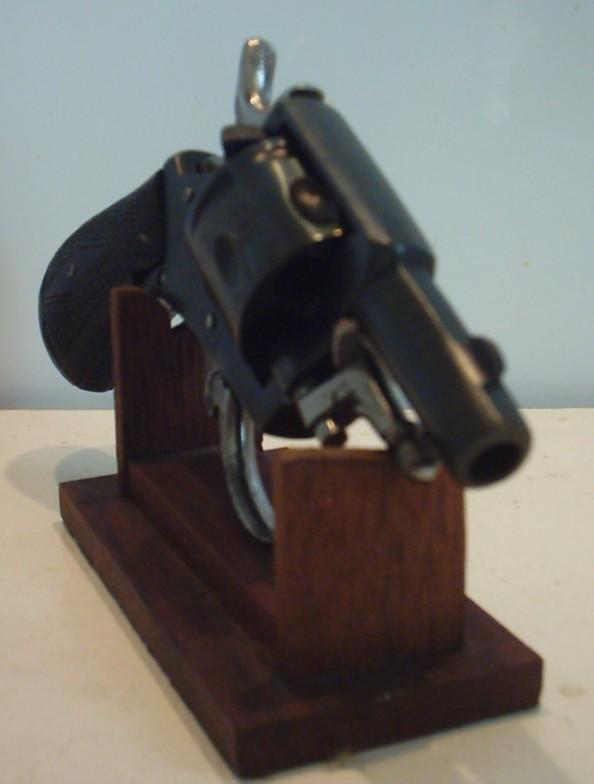
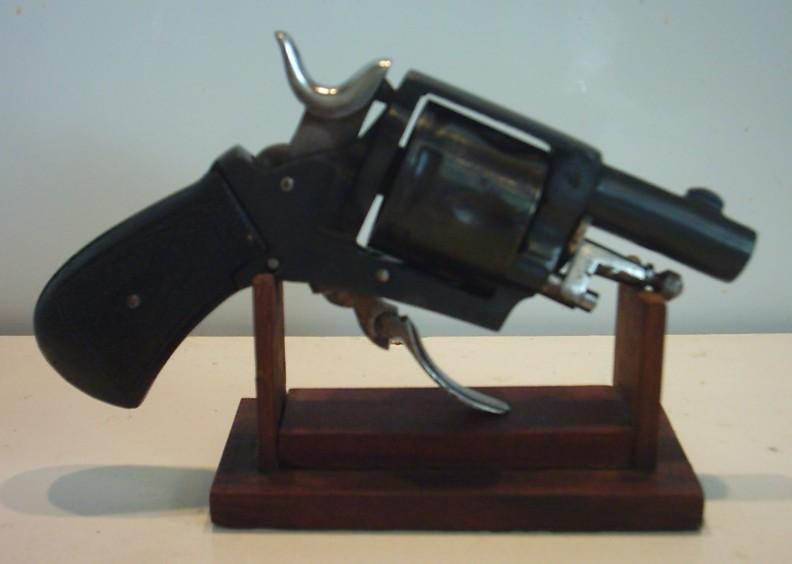
After having been washed for the 3rd time, the parts are ready. As can be seen on the pictures, the blue colour I obtained is deeper and darker than the formal one, and is very close to the original blue.
The loading gate and its spring are still intact.
Remounting and patinating
Now I just have to remount the gun completely, starting with the return spring to the trigger, then the trigger block, the cover plate, the rebound lever; then the hammer and the main spring. At this stade I check the mechanism, the single-action mode and the hammer rebound. Then I can mount the cylinder and its axis, the extractor and its lug and finally the grips which have been varnished in the meantime (see notes).
In my opinion the gun should be patinated a little, in order to break the "new" look; however, the owner prefers it to remain like it is. He is wrong.
Whatever...that nice little gun has recovered its health and certainly a bit more value, at very low costs.

NOTES
Mechanical parts and how they work
The lock mechanism of the vast majority of "common quality" Liège-made revolvers is made of four mobile parts and three springs:
- The trigger block
- The pawl
- The hammer and its flap (not on single-action guns)
- The rebound lever (not on the Lefaucheux-type guns)
- The return spring to the trigger
- The pawl spring
- The main spring
The trigger block is the actual trigger and, above it, a block which articulates on a transverse axis, with on its forepart a lip that lends on the return spring, and on its rear another lip, longer and curved, which activates the hammer flap and acts as trigger nose. Between both is a raised portion, which is the cylinder locking cam.
When the trigger is squeezed, the trigger block basculates forward, which causes the locking cam to move upwards and to engage one of the cylinder locking notches, so that the cylinder locks in place with one chamber in perfect alignment with the barrel.
When the hammer is in resting position, the cam looses contact with the cylinder, enabling it to turn freely, unlike on the American-made revolvers. Those have a separate locking cam, which is permanently engaged in one of the locking notches and is activated by the hammer. In the cocking movement, the cam is released for a fraction of a second to enable the cylinder to turn, then comes back upwards. Therefore American guns often show a circular scratch on the cylinder surface, caused by its friction against the cam.
The pawl is a small steel tooth, provided with a transverse axis at its bottom end, which articulates in a hole drilled in the trigger block. When the trigger is squeezed, the upward movement of the back of the trigger block forces the pawl to move upwards in an inner channel, so that its upper end engages the ratchet teeth, causing the cylinder to rotate (the ratchet is the toothed crown found on the rear of any revolver cylinder). The pawl is kept into place in its channel by a tiny curved spring called the "pawl spring".
The hammer flap is the articulated small flap at the foreside of a double-action hammer. By squeezing the trigger, the trigger nose moves upwards and engages the flap, causing the hammer to cock. At full cock, the trigger nose escapes the flap, and the hammer falls down to fire the round. When the trigger is released, the trigger nose comes down and pushes on the hinged flap in the reverse direction, so that the latter moves backwards against the hammer to clear the way. In resting position, the trigger nose rests between the flap and the hammer heel.
By thumb-cocking, the flap remains inactive; it's the hammer heel that takes the trigger nose upwards. At full cock, the trigger nose engages a notch cut into the hammer heel, and holds the hammer in position until the trigger is squeezed.
Double-action revolver has spur less hammers
Guns in both single and double action have no half-cocked notch
Single action revolvers hammers have always a spur but no hammer flap. They all have a half-cocked notch.
The rebound lever can show different shapes, yet on the guns we are now talking about it is the small L-shaped part behind and under the hammer heel. It articulates on a transverse axis as well. After shooting, when the trigger is released, the convex shaped rear of the trigger block pushes on the forward end of the lever and forces it down. The rear part moves upwards against the hammer heel, drawing the hammer head back a few millimetres. This features prevent the firing pin of stacking into a cartridge primer but acts in the first place as a safety because it prevents the firing pin of hitting a cartridge in case of dropping or shock against the hammer head. That feature does not exist on pinfire revolvers except on some "improved" models like those influenced by Gasser.
A little bit gunsmithing...
The patina as I called it here consists in giving a restored antique gun its "used" look. After reblueing, the edges and the exposed surfaces are lightly rubbed with very fine grain sandpaper or steel wool, in order to clear up or delete the blue like on a used arm. The bore and the chambers are treated the same ways and artificially "rusted" with a cloth drenched in chloridric acid (mind the stains); the rust is stabilized with an oiled cloth, which will leave a black-brown colour. If done properly, the patina can be very convincing, however it is fake.
Polishing is a matter of patience. One can start with a 300 or 400 grain, then a 600, an 800 and a 1000. To obtain a "mirror" look, a very fine 2500 and a 4000 can be used, yet those are not available in the common Do-It-Yourself shops. However, the same result can be reached using old used 800 and 1000 sheets or very fine steel wool with oil. All the small corners and places difficult to reach should be done, and each new sandpaper is meant to remove all traces the precedent one has left behind. A better result can be obtained by wrapping a wooden block into the piece of sandpaper for the treatment of flat surfaces.
Reblueing There are dozens of methods for reblueing, all fully detailed in the specialized literature. I stay to only two methods, that I have been practisizing often enough to get some good control of blueing by heat, either in an oven or a bath of melted saltpetre. I explained how to reblue in an oven in the precedent chapter. The needed material is simple and cheap: a simple gas furnace of the CampingGaz type and a metal box or can with a lid. I use an old steel bread baking form, which I cover with a piece of flat iron. That "box" acts as an oven and enables for a more regular repartition of the heat. The parts to be reblued are placed into the box, the box is covered and then placed on the furnace for about 10 minutes, depending on their size. Then I take them out and plunge them into oil. The oil will cool them rather slowly and will provide a homogeny colour on the entire piece, avoiding the colour variations like in the "flamed blue".
The part do not blue while on fire nor in the oil; they do while they are cooling. The nature of the oil is not important, as long as is having enough density and is heat resistant. Personally I use common 30/40 engine oil. Some vegetal oils as well as frying oil can also be used.
If one can manage to buy some pure crystallized saltpetre, a nice blue colour can be obtained by heating the saltpetre until it melts and becomes a water-like, somehow yellow liquid (abt 330°C). Put into that bath, the parts immediately cover with bells and, as soon as they have reached the ambient temperature they will start darkening, the colour pallet going from light blue to black. Take them out as soon as they have reached the wanted colour, and boil them in hot water with detergent for about 30 minutes, then dry and oil.
Matine-varnishing is a very old method of varnishing wood, but also very easy to do. Matine-varnish is available in all good drugstores. It resembles milk, and has the same density. Take a piece of cotton cloth, roll it and dip it into the varnish; then wrap it into another, dry cloth and rub the wood firmly, always in the same direction. The heat produced by the friction causes the varnish to dry immediately, with a high brilliance. Because the varnish dries instantly, there are no risks of finger traces nor dirt and dust englued in the surface, and no brush traces either. For a bright result, two or three lays are applied, with at least 3 days between them to enable the varnish to
Harden. Last is given a lay of a finishing varnish, called "popotte", and applied the same way. The best matine-varnishes are those made on basis of copal resin, but the synthetic ones give also very nice results.
MARCEL